I purchased a pair of Jennov “A31-2” cameras from Amazon for just under $25 on their “Big Spring Sale” (so less than $12.50 per camera). From the reviews, it seemed like the app was required to connect them to WiFi. After they arrived, I installed the app on a spare Android phone, but it also required a user registration with an email address. Too much work!
TL;DR:
* Format a MicroSD card with a FAT filesystem (probably needs to be MBR)
* Create an empty file at the top level named "debug.ini"
* Create a shell script and name it "anyka_ipc_nostrip". If present, this script will be run on powerup (but no network init will be done if it is)
* The MicroSD card will be mounted at /mnt/tf
* Config files are in a read/write partition, mounted at /etc/jffs2
Step 1: Extracting flash
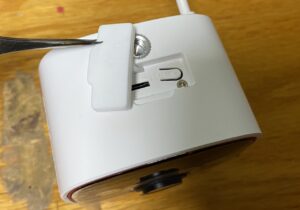
Remove the single Philips screw underneath the rubber flap covering the SD card. Pry the camera assembly out from the front (this may damage the rubber gasket around the lens assembly). Detach the connectors and unscrew the board from the plastic bits.
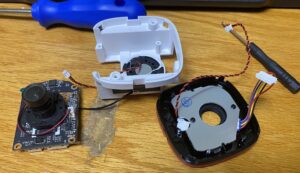
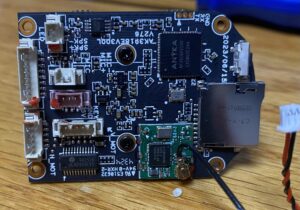
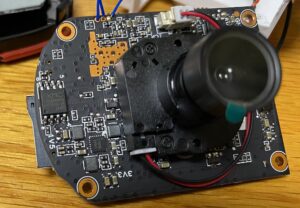
There is a 3.3V UART connector right above the SoC. I got a U-Boot header out of it, but nothing else:
NbA

U-Boot 2019.10.0-V4.0.24 (May 09 2024 - 14:35:48 +0800)

860
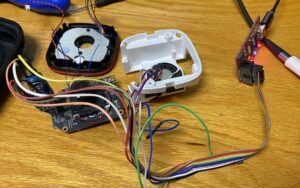
The flash chip on the front (opposite the MicroSD slot) is an XMC XM25QH64C 64Mbit (8 MB) part. I lifted the VCC pin and used a Bus Pirate and flashrom to extract the contents.
flashrom --programmer buspirate_spi:dev=/dev/ttyUSB0 -r jennov_full.bin -V -o read.txt -c XM25QH64C
Step 2: Extracting filesystems.
I used binwalk to dump the flash contents. Just running “binwalk -e jennov_full.bin” extracted the files from the compressed filesystems.
Step 3: Getting command execution
I looked through the contents of the files, searching for any references to the SD card (the “mmcblk” device on Linux). I found a script in /sbin/anyka_ipc.sh that looked for a file named “debug.ini” and would also execute a file from the card if present, in place of the main application. Here is the relevant extract from that file:
	DEBUG_INI_PATH="/mnt/tf/debug.ini"
	PDTEST_INI_PATH="/mnt/tf/production_test.ini"
	MOUNT_DIR=/mnt/tf
	MMC_DEV=/dev/mmcblk0
	MMC_FS=/dev/mmcblk0p1
	LOG_REDIRECT=0
	umask 077
	ulimit -s 256
	echo 3 > /proc/sys/vm/drop_caches
	usleep 300000
	if [ -e $MMC_DEV ];then
		echo "exist mmcblk0"
		if [ -e $MMC_FS ];then
			echo "exist mmcblk0p1"
			mkdir $MOUNT_DIR
			mount $MMC_FS $MOUNT_DIR
		fi
	fi

	if [ -f "$DEBUG_INI_PATH" ];then

		ulimit -c unlimited
		ulimit -a
		echo "/mnt/tf/%e_%t.core" > /proc/sys/kernel/core_pattern
		if [ -e $MOUNT_DIR/anyka_ipc_nostrip ];then
			mount --bind $MOUNT_DIR/anyka_ipc_nostrip /usr/bin/anyka_ipc
		fi

		if [ -f "$PDTEST_INI_PATH" ];then
			echo "production test mode, no redirect log"
		else
			LOG_REDIRECT=1
		fi

		if [ -f "/mnt/tf/log_no_redirect" ];then
			LOG_REDIRECT=0
		fi

	fi

	pid=`pgrep anyka_ipc`
    if [ "$pid" = "" ]
    then
		if [ $LOG_REDIRECT == 1 ];then
			REBOOTTIMES=1;
			if [ -f "$MOUNT_DIR/.reboot" ];then
				REBOOTTIMES=`cat "$MOUNT_DIR/.reboot"`;let REBOOTTIMES+=1;
			fi

			echo "$REBOOTTIMES" > "$MOUNT_DIR/.reboot";
			cat /proc/kmsg >> $MOUNT_DIR/kmsg.$REBOOTTIMES.log & 2>&1

			CURTIME=`date +%y%m%d_%H%M%S`
			LOG_FILE=ipc_$CURTIME.$REBOOTTIMES.log
			echo $LOG_FILE
			touch "$MOUNT_DIR/$LOG_FILE"
			if [ -f "$MOUNT_DIR/$LOG_FILE" ];then
				anyka_ipc >> "$MOUNT_DIR/$LOG_FILE" 2>&1
			else
				anyka_ipc
			fi
		else
			anyka_ipc
		fi
		sync
		echo "anyka_ipc exit"
	fi
Key points:
- If debug.ini is present, then both kmsg and the output of the “anyka_ipc” app are written to log files on the SD card.
- If “anyka_ipc_nostrip” is present, then that file is mounted in place of the real “anyka_ipc” app (which is then run).
When my “anyka_ipc_nostrip” script was run in place of the real “anyka_ipc” application, the WiFi initialization did not happen. That was seemingly done by the same monolithic binary. To get around this, I copied the original binary from my extracted files to the SD card, and ran it at the end of the script.
I was also able to extract the /etc/passwd file, although I was not able to crack the root password:
root:8/3DL08/eA4ic:0:0:root:/:/bin/sh
daemon:x:1:1:daemon:/usr/sbin:/bin/sh
bin:x:2:2:bin:/bin:/bin/sh
nobody:x:99:99:nobody:/home:/bin/sh
Step 4: Connecting to the WiFi network
Out of the box, the camera creates a network named “IPC<numbers>” with a password. The password was not anything like the serial number, or the number in the QR code on the side.
With the log files, I was able to see the flash layout, from the perspective of the Linux MTD driver:
0x000000000000-0x00000002e000 : "UBOOT"
0x00000002e000-0x00000002f000 : "ENV"
0x00000002f000-0x000000030000 : "BKENV"
0x000000030000-0x000000040000 : "DTB"
0x000000040000-0x0000001d0000 : "KERNEL"
0x0000001d0000-0x000000290000 : "ROOTFS"
0x000000290000-0x00000078e000 : "APP"
0x00000078e000-0x0000007fe000 : "CONFIG"
0x0000007fe000-0x000000800000 : "FACTORY"
After dumping each partition and running strings on them, the “CONFIG” had the following:
(...)
ssid=AK_IPC
wpa_passphrase="11111111"
(...)
max_leases 52
start 172.14.10.1
end 172.14.10.52
(...)
Testing it out, “11111111” worked as a password, and my laptop did indeed get an address in the 172.14.10.x range. I was able to telnet to the device at 172.14.10.1, but could not log in without the root password.
Note: This IP is publicly routable, I’m not sure why it was chosen. Maybe it was supposed to be in the 172.16.0.0/12 range?
Step 5: Getting root access
At this point, I put four files on the SD card:
- “passwd” with the root password changed to “kxK7xT3Ua2dGw” (abcd)
- “debug.ini” (empty)
- “real_anyka_ipc” (extracted from “anyka_ipc” from the flash dump)
- “anyka_ipc_nostrip”, a shell script with the contents as follows:
#!/bin/sh
mount --bind /mnt/tf/passwd /etc/passwd
/mnt/tf/real_anyka_ipc >> /mnt/tf/real_anyka_log.txt 2>&1
With this in place, I was able to telnet to the device, log in as root, and poke around.
Step 6: Persistent network configuration
In /etc/jffs2/config/ there are many JSON configuration files. In particular, the relevant ones are network.json and sysmisc.json. For my use case, I wanted this camera on an isolated WiFi network (with no internet access and no DHCP server).
The network.json file should be self explanatory, but after a minute or so of being connected, some kind of watchdog reset the settings and rebooted the device. I’m not sure which one was relevant to fix it, but here is my diff for sysmisc.json:
diff -ruN jffs2/config/sysmisc.json jffs2_fixed/config/sysmisc.json
--- jffs2/config/sysmisc.json	2025-03-27 20:31:12.219957002 -0700
+++ jffs2_fixed/config/sysmisc.json	2025-03-27 22:58:20.631947669 -0700
@@ -1,24 +1,24 @@
 {
 	"PromptSound":	{
-		"Enable":	true,
+		"Enable":	false,
 		"enType":	1,
 		"enFileFormat":	1
 	},
 	"ConvenientSetting":	{
-		"Enable":	true,
+		"Enable":	false,
 		"enType":	0
 	},
 	"SystemMaintenance":	{
-		"Enable":	true,
+		"Enable":	false,
 		"nInterval":	604800,
 		"enType":	0
 	},
 	"UlinkToken":	"ulinktoken",
-	"SuccessWifi":	false,
-	"enNetMode":	0,
-	"bPrompt":	true,
+	"SuccessWifi":	true,
+	"enNetMode":	1,
+	"bPrompt":	false,
 	"bReboot":	false,
-	"enWifiMode":	0,
+	"enWifiMode":	1,
 	"bPirEnabled":	true,
 	"bAlexa":	false,
 	"strRebootMsg":	"00-00-00",
@@ -26,11 +26,11 @@
 		"bMonopoly":	false,
 		"strDevicePsk":	""
 	},
-	"bInitOnvif":	false,
+	"bInitOnvif":	true,
 	"nAlarmDurSec":	5,
-	"bPrivateMode":	false,
+	"bPrivateMode":	true,
 	"LedEnabled":	true,
 	"stRtmpUrl":	"",
-	"bRtmpEnable":	false,
-	"nMatchNetErrors":	0
+	"bRtmpEnable":	true,
+	"nMatchNetErrors":	1
 }
\ No newline at end of file
Step 7: Connecting to the video stream
After replacing the json files, the device connected to the WiFi network, and I was able to ping the static IP I had specified, even with the SD card removed. Telnet was no longer running without the SD card, presumably due to debug.ini not being present. It was also possible to copy the json files directly from the anyka_ipc_nostrip script, without having to telnet in or make any other changes.
With the RTSP server enabled above, I used the following URL to get video to Frigate NVR:
rtsp://admin:admin@<IP Address>:554/ch0_0.264
Final thoughts
I have not tested the stability of these cameras, nor looked at tuning the video stream in any way, or adjusting any of the options (like the LEDs, or other hardware features).
There are other cameras similar to this one that have been hacked through similar mechanisms (although details differ in terms of script locations, memory layouts, etc):